16 KiB
面向初学者的 Python 项目:比特币价格通知
欢迎阅读面向初学者的 Python 项目系列文章的第一篇!
在本教程中,我们将构建一个比特币价格通知服务—
在这个项目中,您将了解 HTTP 请求以及如何使用(适当命名的)requests包发送它们。
您将了解 webhooks,以及如何使用它们将您的 Python 应用程序连接到外部服务,如电话通知或电报信息。
用相对少的代码(大约 50 行),你将得到一个成熟的比特币价格通知服务,它将很容易扩展到其他加密货币和服务。
所以让我们直接开始吧:
用 Python 发布比特币价格通知
众所周知,比特币价格是一个善变的东西。你永远不知道一天结束时它会在哪里。因此,与其不断地在各种网站上寻找最新的更新,不如让 Python 应用程序来帮你完成这项工作。
为此,我们将使用流行的自动化网站 IFTTT 。if TTT(“if this,then that”)是一种网络服务,它弥合了不同应用程序和设备之间的差距。
我们将创建两个 IFTTT 小程序:
- 一个用于当比特币价格低于某个阈值时的紧急通知;和
- 另一个是定期电报关于比特币价格的更新。
这两者都将由我们的 Python 应用程序触发,该应用程序将使用来自 Coinmarketcap API 的数据。
IFTTT applet 由两部分组成:触发器和动作。
在我们的例子中,触发器将是 IFTTT 提供的 webhook 服务。你可以把 webhooks 看作“用户定义的 HTTP 回调”,你可以在这里阅读更多关于它们的内容。
我们的 Python 应用程序将向 webhook URL 发出 HTTP 请求,这将触发一个操作。现在,这是有趣的部分——动作几乎可以是你想要的任何东西。IFTTT 提供了多种操作,比如发送电子邮件、更新谷歌电子表格,甚至打电话给你。
项目设置
让我们从建立一个虚拟环境开始。运行以下命令以获得新的 Python 3 虚拟环境:
$ mkvirtualenv -p $(which python3) bitcoin_notifications
在继续之前,您必须激活虚拟环境并安装所需的依赖项:
$ workon bitcoin_notifications  # To activate the virtual environment
$ pip install requests==2.18.4  # We only need the requests package
您可以通过运行deactivate shell 命令来停用虚拟环境。
检索比特币价格
是时候把手弄脏了。我们可以从 Python 控制台中的 Coinmarketcap API 获取最新价格开始:
首先,我们必须导入模块requests并定义bitcoin_api_url变量,该变量包含比特币的 Coinmarketcap API URL。
接下来,我们使用requests.get()函数向 URL 发送一个 HTTP GET 请求,并保存响应。由于 API 返回一个 JSON 响应,我们可以通过调用响应上的.json()函数将它转换成一个 Python 对象。如您所见,API 返回了一个列表,其中一个元素包含比特币价格数据:
>>> import requests
>>> bitcoin_api_url = 'https://api.coinmarketcap.com/v1/ticker/bitcoin/'
>>> response = requests.get(bitcoin_api_url)
>>> response_json = response.json()
>>> type(response_json) # The API returns a list
<class 'list'>
>>> # Bitcoin data is the first element of the list
>>> response_json[0]
{'id': 'bitcoin', 'name': 'Bitcoin', 'symbol': 'BTC', 'rank': '1',
 'price_usd': '10226.7', 'price_btc': '1.0', '24h_volume_usd': '7585280000.0',
 'market_cap_usd': '172661078165', 'available_supply': '16883362.0',
 'total_supply': '16883362.0', 'max_supply': '21000000.0',
 'percent_change_1h': '0.67', 'percent_change_24h': '0.78',
 'percent_change_7d': '-4.79', 'last_updated': '1519465767'}
我们最感兴趣的属性是'price_usd'——以美元计算的比特币价格。
发送测试 IFTTT 通知
现在我们可以进入事情的 IFTTT 方面了。要使用 IFTTT,你首先需要建立一个新账户并安装他们的移动应用程序(如果你想从你的 Python 应用程序接收电话通知)。一旦你设置好了,我们将创建一个新的 IFTTT 小程序用于测试目的。
要创建新的测试小程序,请按照下列步骤操作:
- 点击大的*“本”*按钮
- 搜索*“web hooks”服务,选择“接收 web 请求”*触发器
- 让我们把这个事件命名为
test_event - 现在选择大的那个按钮
- 搜索*“通知”服务,选择“从 IFTTT 应用发送通知”*
- 将消息更改为
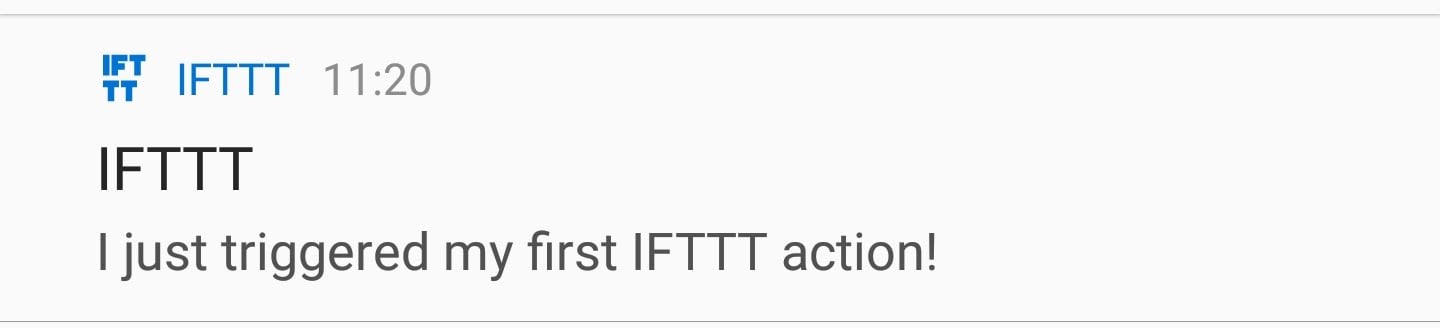
I just triggered my first IFTTT action!并点击*“创建行动”* - 点击*“完成”*按钮,我们就完成了
要查看关于如何使用 IFTTT webhooks 的文档,请进入此页面并点击右上角的*“文档”*按钮。文档页面包含 webhook URL,看起来像这样:
https://maker.ifttt.com/trigger/{event}/with/key/{your-IFTTT-key}
接下来,您需要用您在步骤 3 中创建 applet 时为我们的事件指定的名称替换{event}部分。{your-IFTTT-key}部分已经用 IFTTT 键填充。
现在复制 webhook URL 并启动另一个 Python 控制台。我们再次导入模块requests并定义 webhook URL 变量。现在我们只需使用requests.post()函数向 IFTTT webhook URL 发送一个 HTTP POST 请求:
>>> import requests
>>> # Make sure that your key is in the URL
>>> ifttt_webhook_url = 'https://maker.ifttt.com/trigger/test_event/with/key/{your-IFTTT-key}'
>>> requests.post(ifttt_webhook_url)
<Response [200]>
运行完最后一行后,您应该会在手机上看到一个通知:
创建 IFTTT 小程序
现在我们终于准备好了主要部分。在开始编写代码之前,我们需要创建两个新的 IFTTT 小程序:一个用于紧急比特币价格通知,一个用于定期更新。
紧急比特币价格通知小程序:
- 选择*“web hooks”服务,选择“接收 web 请求”*触发器
- 命名事件
bitcoin_price_emergency - 对于操作,选择*“通知”服务,并选择“从 IFTTT 应用程序发送丰富通知”*操作
- 给它起个标题,像*“比特币价格紧急事件!”*
- 将消息设置为
Bitcoin price is at ${{Value1}}. Buy or sell now!(稍后我们将返回到{{Value1}}部分) - 你可以选择添加一个链接 URL 到 Coinmarketcap 比特币页面:
https://coinmarketcap.com/currencies/bitcoin/ - 创建动作并完成 applet 的设置
定期价格更新小程序:
- 再次选择*“web hooks”服务,并选择“接收 web 请求”*触发器
- 命名事件
bitcoin_price_update - 对于动作,选择*“电报”服务,并选择“发送消息”*动作
- 将消息文本设置为:
Latest bitcoin prices:<br>{{Value1}} - 创建动作,并以 applet 结束
**注意:**创建此小程序时,您必须授权 IFTTT 电报机器人。
将所有这些放在一起
现在我们已经解决了 IFTTT,让我们开始编码吧!您将首先创建如下所示的标准 Python 命令行应用程序框架。将这段代码保存在一个名为bitcoin_notifications.py的文件中:
import requests
import time
from datetime import datetime

def main():
    pass

if __name__ == '__main__':
    main()
接下来,我们必须将之前的两个 Python 控制台会话转换为两个函数,这两个函数将分别返回最新的比特币价格和发布到 IFTTT webhook。在主功能上增加以下功能:
BITCOIN_API_URL = 'https://api.coinmarketcap.com/v1/ticker/bitcoin/'
IFTTT_WEBHOOKS_URL = 'https://maker.ifttt.com/trigger/{}/with/key/{your-IFTTT-key}'

def get_latest_bitcoin_price():
    response = requests.get(BITCOIN_API_URL)
    response_json = response.json()
    # Convert the price to a floating point number
    return float(response_json[0]['price_usd'])

def post_ifttt_webhook(event, value):
    # The payload that will be sent to IFTTT service
    data = {'value1': value}
    # inserts our desired event
    ifttt_event_url = IFTTT_WEBHOOKS_URL.format(event)
    # Sends a HTTP POST request to the webhook URL
    requests.post(ifttt_event_url, json=data)
除了我们必须将价格从字符串转换成浮点数的部分之外,get_latest_bitcoin_price几乎是一样的。post_ifttt_webhook接受两个参数:event和value。
event参数对应于我们在设置 IFTTT 小程序时赋予触发器的任何事件名称。此外,IFTTT webhooks 允许我们将附加数据作为 JSON 格式的数据随请求一起发送。
这就是为什么我们需要value参数:当设置我们的小程序时,我们在消息字段中留下了一个{{Value1}}标签。这个标签被 JSON 负载中的'value1'文本替换。requests.post()函数允许我们通过添加json关键字来发送额外的 JSON 数据。
现在我们可以在main函数中继续我们应用程序的核心。它将由一个while True循环组成,因为我们希望我们的应用程序永远运行。在循环中,我们将调用 Coinmarketcap API 来获取最新的比特币价格,并记录当前的日期和时间。
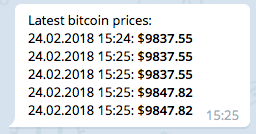
根据目前的价格,我们将决定是否要发送紧急通知。对于我们的定期电报更新,我们还会将当前价格和日期附加到一个bitcoin_history列表中。一旦列表达到一定数量的项目(如 5),我们将格式化项目,将更新发送到 Telegram,并重置历史以备将来更新。
哇哦!如你所见,这个应用程序有很多功能。如果你在理解我们到目前为止得到的代码时有困难,那么休息一下,慢慢地再读一遍上面的部分。这并不容易,所以慢慢来,不要担心第一次就把一切都做好。
重要的是避免过于频繁地发出这些请求,原因有二:
- Coinmarketcap API 声明他们每 5 分钟才更新一次数据,所以没有必要更频繁地重新加载最新的价格信息
- 如果您的应用程序向 Coinmarketcap API 发送了太多请求,您的 IP 可能会被禁止或暂时暂停。
这就是为什么我们需要在获得新数据之前“休眠”(停止循环的执行)至少 5 分钟。下面的代码实现了我上面提到的所有必需的特性:
BITCOIN_PRICE_THRESHOLD = 10000  # Set this to whatever you like

def main():
    bitcoin_history = []
    while True:
        price = get_latest_bitcoin_price()
        date = datetime.now()
        bitcoin_history.append({'date': date, 'price': price})

        # Send an emergency notification
        if price < BITCOIN_PRICE_THRESHOLD:
            post_ifttt_webhook('bitcoin_price_emergency', price)

        # Send a Telegram notification
        # Once we have 5 items in our bitcoin_history send an update
        if len(bitcoin_history) == 5:
            post_ifttt_webhook('bitcoin_price_update',
                               format_bitcoin_history(bitcoin_history))
            # Reset the history
            bitcoin_history = []

        # Sleep for 5 minutes
        # (For testing purposes you can set it to a lower number)
        time.sleep(5 * 60)
我们快完成了!唯一缺少的是format_bitcoin_history函数。它将bitcoin_history作为一个参数,并使用 Telegram 允许的一些基本 HTML 标签对其进行格式化,比如<br>、<b>、<i>等等。将此功能复制到main功能之上:
def format_bitcoin_history(bitcoin_history):
    rows = []
    for bitcoin_price in bitcoin_history:
        # Formats the date into a string: '24.02.2018 15:09'
        date = bitcoin_price['date'].strftime('%d.%m.%Y %H:%M')
        price = bitcoin_price['price']
        # <b> (bold) tag creates bolded text
        # 24.02.2018 15:09: $<b>10123.4</b>
        row = '{}: $<b>{}</b>'.format(date, price)
        rows.append(row)

    # Use a <br> (break) tag to create a new line
    # Join the rows delimited by <br> tag: row1<br>row2<br>row3
    return '<br>'.join(rows)
这是你手机上的最终结果:
要运行价格通知应用程序,请在命令行终端中执行以下操作:
$ python bitcoin_notifications.py
就是这样!在略多于 50 行的 Python 代码中,您已经创建了自己的比特币通知服务。恭喜你!下面我添加了完整的代码,这样你可以比较一下,看看你是否遗漏了什么:
import requests
import time
from datetime import datetime

BITCOIN_PRICE_THRESHOLD = 10000
BITCOIN_API_URL = 'https://api.coinmarketcap.com/v1/ticker/bitcoin/'
IFTTT_WEBHOOKS_URL = 'https://maker.ifttt.com/trigger/{}/with/key/{your-IFTTT-key}'

def get_latest_bitcoin_price():
    response = requests.get(BITCOIN_API_URL)
    response_json = response.json()
    return float(response_json[0]['price_usd'])  # Convert the price to a floating point number

def post_ifttt_webhook(event, value):
    data = {'value1': value}  # The payload that will be sent to IFTTT service
    ifttt_event_url = IFTTT_WEBHOOKS_URL.format(event)  # Inserts our desired event
    requests.post(ifttt_event_url, json=data)  # Sends a HTTP POST request to the webhook URL

def format_bitcoin_history(bitcoin_history):
    rows = []
    for bitcoin_price in bitcoin_history:
        date = bitcoin_price['date'].strftime('%d.%m.%Y %H:%M')  # Formats the date into a string: '24.02.2018 15:09'
        price = bitcoin_price['price']
        # <b> (bold) tag creates bolded text
        row = '{}: $<b>{}</b>'.format(date, price)  # 24.02.2018 15:09: $<b>10123.4</b>
        rows.append(row)

    # Use a <br> (break) tag to create a new line
    return '<br>'.join(rows)  # Join the rows delimited by <br> tag: row1<br>row2<br>row3

def main():
    bitcoin_history = []
    while True:
        price = get_latest_bitcoin_price()
        date = datetime.now()
        bitcoin_history.append({'date': date, 'price': price})

        # Send an emergency notification
        if price < BITCOIN_PRICE_THRESHOLD:
            post_ifttt_webhook('bitcoin_price_emergency', price)

        # Send a Telegram notification
        if len(bitcoin_history) == 5:  # Once we have 5 items in our bitcoin_history send an update
            post_ifttt_webhook('bitcoin_price_update', format_bitcoin_history(bitcoin_history))
            # Reset the history
            bitcoin_history = []

        time.sleep(5 * 60)  # Sleep for 5 minutes (for testing purposes you can set it to a lower number)

if __name__ == '__main__':
    main()
回顾和后续步骤
在本文中,我们创建了自己的比特币通知服务。您学习了如何使用requests包发送 HTTP GET 和 POST 请求。您看到了使用 IFTTT 和 webhooks 将 Python 应用程序连接到外部服务是多么容易。
现在,你下一步应该去哪里?使用 Python 和 IFTTT,天空是无限的。但是这里有一些建议可以帮助你开始:
- 比如电子表格?使用 IFTTT 操作将比特币价格添加到 Google 电子表格中
- 改善
if price < BITCOIN_PRICE_THRESHOLD条件,每天只收到一次通知(否则,如果比特币持续走低,这将变得非常烦人) - 更喜欢以太坊/莱特币/Dogecoin?将
get_latest_bitcoin_price更改为get_latest_cryptocurrency_price,它将接受加密货币作为参数并返回其价格 - 你想要不同货币的价格?检查 Coinmarketcap API 中的
convert参数。
此外,这将是一个持续的系列,您可以构建更多的 Python 项目来提高您的技能。不要错过下一个教程:
**获得通知:**不要错过本教程的后续— 点击这里加入真正的 Python 时事通讯你会知道下一期什么时候出来。
祝好运和快乐的蟒蛇!请在下面的评论中让我知道你用 Python 和 IFTTT 构建了什么!***